Check out this cute Ornament at WildOlive If only I had any time right now I would totally make this!
I love how it depicts the true meaning of Christmas.
Speaking of the true meaning of Christmas it is my turn this week to teach our neighborhood 3 year old pre-school. Tuesday we talked about why we celebrate Christmas and that it is Jesus' Birthday. We also talked about what kind of gift Jesus would want for his birthday. We decided that the best gift we could give Jesus is to be kind and loving to eachother and to share with eachother and to help eachother. So when I saw this little clip I knew that I had to show it to them tomorrow :-) It is the perfect example of a gift to Jesus!
Showing posts with label Super Saturday Ideas. Show all posts
Wednesday, December 14, 2011
Monday, November 28, 2011
Crazy busy!
I have been super busy the last 3 weeks trying to keep up with my Etsy store. My biggest seller being my Nativity puzzles! So forgive me if I do not post much in December.
Today I thought I would show you my latest ideas that I am selling in my shop.
First off My Mini Nativity Puzzle.
I decided it would be fun to have a smaller version. I can't get my 3 year old to leave it alone! She really likes to play with it. I also thought this smaller version would be fun for super Saturday. I have done the bigger version before with success, but the smaller one is cheaper and a little less time consuming.
Next my Joy letters with baby Jesus.
So as you can see my wood burning is still going strong! This baby Jesus was fun to make :-)
The most popular thing in my store that everyone seems to want is my Wood burned, water color, dark stained Nativity puzzle.
so that is what I will be doing non stop until about mid December! but I will ride this wave as far as it will take me :-)
Happy crafting!
Michelle
Wednesday, October 19, 2011
Spooky! And other crafts :-)
My kids complained that I keep making cute wood crafts for others and not our self so these are some Spooky letters I made to put on to of our piano :-)
Here are a couple of Halloween stitcherys that I have made also that I think are fun.
My kids love this one! They always ask when we are going to put this decoration up because they love the saying :-)
Here is another fun Witch boot I made :-) I added glitter to it to add some sparkle :-) I like this one a lot! can't decide if I want to part with it or not.
I still need to antique the edges and add some embellishments,but I thought I would show what I have so far because I have been so busy making Turkeys like this one below that this has been put on the back burner.
These Turkeys are what everyone seems to want right now at my Etsy shop. I made two more today. I just don't think there are enough cute Thanksgiving decorations these days.Here are a couple of Halloween stitcherys that I have made also that I think are fun.
This one is so cute and simple and so easy! The picture is kind of bright so you can't tell what the top button is. It is a crescent moon.
My kids love this one! They always ask when we are going to put this decoration up because they love the saying :-)
Here is another fun Witch boot I made :-) I added glitter to it to add some sparkle :-) I like this one a lot! can't decide if I want to part with it or not.
Sunday, October 2, 2011
Another cute Turkey!
Here is my latest scroll saw creation :-) My 15 year old daughter says she likes this turkey even more than the 2x4 turkey. I have to admit that it turned out pretty cute :-)
Like the other wood crafts I have made lately it is decorated with paint and scrapbook paper.
I also came up with this Owl on a limb with left over wood scraps ;-)
I have an Idea that I want to do with it. I will show you soon what I came up with.
If you are interested in any of these wood crafts to paint and create yourself or to buy finished check out my Etsy store @ Bug a boo crafts.
Happy crafting!
Saturday, September 24, 2011
If the shoe fits!
So I still am having fun with the scroll saw! I cut this Witch Boot out today. and I could not wait to get my crafty little hands on it and decorate it. I still need to add some finishing touches (ribbon etc), but I could not wait to share! I borrowed the design again from Wood Connection, however I did not like the top of their boot so I changed it to my taste (I thought it made it look more witchy this way). I want to sit it on a rectangular block and have a vinyl saying on it that says "If the shoe fits!"
To see my other wood crafts check out my Etsy store Bugaboocrafts.
Thursday, September 22, 2011
Having fun with the Scroll Saw!
Hey everyone out there in blog land :-)
I am following up with a couple of wood crafts that I cut with the scroll saw.
First of all I want to say that I usually borrow others creative inspiration and put my own take on it and these crafts are no exception. So I want to give credit where credit is due.
In Salt Lake there is this awesome crafty wood shop called "The Wood connection". Seriously If I go into this shop I do not come out for hours! My sister Paula can attest to this because she has the same addiction :-) Anyway they have these cute "Harvest" letters with a little corn cob for the V that I just love, but I am about 45 minutes too far away from that store so I thought I can cut it out myself! My talented brother helped make a pattern for me and this is how it turned out!
Here are the letters that I am proud to say I cut out.
Here it is after I Painted and mod podged it!
Here is a close up of the cute ear of corn.
I added these little gems to give it some blingy corn kernals :-)
I would love to take credit for that cute idea, but The wood connections creative staff came up with that idea.
I have also been excited about this cute 2x4 turkey craft from "Craft Goodies" since last year, but I never got a chance to make it, but I pulled it together today and I love how it turned out!
I still need to make some finishing touches like add the feather on top of it's head etc., but I could not wait to show it off :-) (here is a link to the tutorial)
Craft goodies has some great Super Saturday ideas she is sharing right now. So if you are a Super Saturday freak like me check it out!
Sunday, September 18, 2011
Nativity Puzzles are ready!
I have my Nativity Puzzles in my Esty store again! Just click on my Etsy store page above and it will take you there :-)
I have decided I have a new life calling! Mother by day and Scroll Saw addict by night :-)
Now that I know how to use the dumb thing I can't stop! I have a few things I am working on besides the puzzles that I can't wait to show you! I will give you a hint :-) It involves a Witch boot, Owl, Turkey and the word Harvest!
Sunday, August 14, 2011
Add flare to onesies and T-Shirts!
My baby just turned 3 :-(
I can't believe how fast time is flying! There are so many projects that I intended on doing when she was a baby and just did not ever do!
My sister in law is expecting a baby in October and had her baby shower a week ago. In deciding what to do for a gift I remembered that I had onesies in my craft room that I never did anything with.
I really liked the ruffle butt idea I saw here. So here is what I came up with. I wish I had a baby to display it on, but I think you can get the idea :-)
And I did this cute stitchery on this Onesie a while ago,
but I had never done more with it and it has been sitting in my craft room waiting to be given away. I felt it needed more added to it though so I added this ruffle skirt to the bottom of it.
Here is another fun Idea I found @ Sir Bubbadoo. Freezer paper stenciling! This looks so fun and easy!
And check out this idea using bleach!
you can find this idea @ Home maker.
Saturday, August 13, 2011
Weekly Menu board
I think this is the cutest thing ever!
I am such a sucker for this kind of stuff! I am wanting to make something like this. or turn my exsisting magnet board into something like this. You can find this idea @ Here.
Monday, April 18, 2011
Cute serving apron
So here is one of the finished half aprons I have been making.
I am making these aprons for a wedding reception. The serving girls are going to wear them, and they are also going to be their gift for helping serve at the reception. I love the simple black and white with just a touch of green :-)
Thursday, March 24, 2011
Another cute apron!
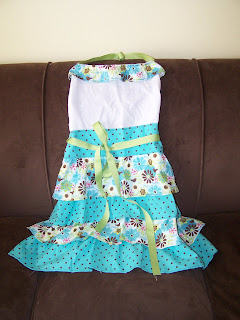
I made another flour sack ruffle apron for my friend :-)
Her daughter is getting married and this is going to be her wedding shower gift. I think the fabric colors are so cute! (you can find the fabric at Hobby Lobby) I switched how I did the ruffle at the top a little bit ( every time I make one of these aprons they turn out just a little bit different. That is how things go when you don't use a pattern :-)
People have asked for instructions for this apron and it is hard because really there is not any solid instructions. I just made it up as I went, but I do have some basic ideas that I can share, but I warn you this will most likely be the worst tutorial to understand so just know you have been warned :-)
I bought a flour sack towel from the dollar store I like to get a flour sack towel because all the edges are already hemmed which saves me a few steps ( I am all about saving steps!), but I do cut the corners off one end of the towel and I hem the new rough edges by pressing under a quarter inch twice and then hem it down until the corners look like this.
Then you need a quarter yard each of two different coordinating fabrics. I cut each quarter yard of fabric into 6 inch wide strips.
Then you press in the sides of each strip of fabric a quarter inch and hem around all sides.
Sew big stitches on one long side and lightly gather into a ruffle.
Then basically you sew the strips of fabric on the flours sack towel about 3 1/2 or 4 inches apart from each other. Do not gather one of the fabric strips because it will be your waist band.
I wish I could tell you exactly how I piece it all together. Sometimes I start sewing the ruffles from the top and sometimes I start from the bottom. And I do the top collar ruffle different every time also. So all I can say is this is what I end up with!
Good luck!
Tuesday, December 21, 2010
More Flour sack Aprons!
I made some more aprons as Christmas gifts.
A thanks to my girls for helping model them for me :-)
I am sorry I still don't have a good tutorial as to how to make these. I don't make them with a pattern I just make them :-) Each one I have made has turned out a little different then the others so their is not an exact way. But basically you need
-a flour sack towel ( I get mine from the dollar store
- 1/2 yard of two different coordinating fabric choices ( cut into 6 inch wide strips)
- coordinating ribbon for the neck band and ties (wide ribbon works best)
- coordinating ric rac for trim (optional)
I have another one to make. I will make sure I take pictures of the process and add the rest of the details soon. but basically most of it is hemming and gathering ruffles and sewing them onto the flour sack towel.
Friday, November 12, 2010
Dollar store inspiration!
Like I said in my last post my Ward had our Super Saturday last weekend. One of our crafts we did were Barn stars mod podged with with scrapbook paper. I wanted to make one for each season that I could switch out hanging in a frame or on my front door, but unfortunately I could not justify the cost of purchasing 4 of them :-( Also I just loved the rustic look of them and could not bare to mod podge over them so I decided keep mine rustic and hung them in my old American themed front room.
Then while I was visiting the dollar store a couple of days ago I made a discovery! I saw these Tin Stars with tacky snowmen and Santa's painted on them. And then my crafting light bulb went bing! up above my head :-) I bought a bunch of them for a dollar each and spray painted them with oil rubbed bronze spray paint. mod podged the scrapbook paper on and antiqued the edges.
I have only done the Christmas ones so far, but I plan on making Fall, Spring and Summer too :-) Next on my agenda for this craft is to find a cute open frame to hang them on. I think I want to hang it on my door. Oh and Paula, just pretend you did not see this or the apron set ;-)
Thursday, November 11, 2010
Another flour sack apron!
My Super Saturday was last Saturday and it was a blast! I was in charge of an apron class. Here is the apron again made in a different fabric from the original one I made. (Don't take too much notice of the wrinkles left over from it being anxiously shoved into my sewing bag after a long day of Super Saturday crafting fun :-) I still have plans of doing a cute stitchery on the front of the apron that would match the fabric. I will have to take the time to take pictures and make a step by step tutorial when I make the next one
Here is the matching Trivit. I found these blank pinewood plauqes @ Michaels. I painted this one antiuqe white and mod podged coordinating fabric from the apron on the top of the plaque wh hard coat mod podge and finished it off with ric rac and added 4 felt feet to the bottom.
Next I made a pinch pot holder. I have seen the oval ones around, but I wanted to make a square one instead so this is what I came up with.
So there is the set! I want to make another pot holder and an actual flour sack towel with matching fabric and ric rac sewn on it to make a complete set. This makes a perfect gift set for christmas or a birthday.
Subscribe to:
Posts (Atom)